Friday, July 5, 2013

Turned Lamp and Photo Slide Shade

I'll be the first to take a drink if asked if I've passed by items simply thinking "psh I can make that".  Extra shot for waving hand and having the look of someone who's "got this" when passing by the item.  Take another if you've never actually done the project that's standing out in your mind.
Though honestly that might be the only reason I'm not bankrupt at this point
For me the longest I've gone on about a project without actually finishing it is for a lamp in my bedroom.  It wasn't intentional, but eventually I admitted I couldn't keep sleeping out on my couch when trying to read.  It's comfortable, but I'm sure that any chiropractor is going to write me off for a lost cause.
My back concurs.
<http://smslowbackpain.com/stop-back-pain/>
Around the time I lost the potential lampshade after Halloween 2012 (my costume was a one night stand... ironically if it was my night stand there would be no lamp) I came into *cough*Groupon*cough* a 1/2 off at a local recycling facility called The Scrap Exchange.  This place is a recycler's dream come true; I think we all need to take the time to appreciate the glory that is any type of industrial/residential scrap you could possibly ever want in a warehouse full of aisles.  Every. Thing.
Barrel diving!
Whist digging through some bins to reach the $20 limit, I found some old slides that covered a trip to China.  The architecture and landscape in the pictures was too much for me to pass up at that time, and I came back with about 10 of them.  Sidebar: this is in fact different than ending up purchasing something that you weren't entirely aware you had in your cart.  Didn't even have a plan for these when I got them.  They just seemed to say something to me.
 Buuuuuuy meeeeeee
Surveys of "rescue" pieces returned 2 common results: complete repurpose or simple refinish.  Because a projector is still in someone's garage waiting to be donated or put out to yard sale, I wrestled with option 1 for a while.  I wanted to preserve the whole point of the slides in the first piece as they were really interesting pieces of (film) history and once the scissors come out, there's no going back.
Are you really sure? Really? But, for real? The awl already did some damage
Slides are normally shared with light so it'd be really cool for them to be shown off in something close to their original purpose.  Liiiiiike maybe a lampshade!  Since I needed more than 10 to prevent blinding myself every time I turned towards the light, I headed to the internet to find someone who could cater to my archaic needs.  This was a tall drink, but it's always better when there's a tad more alcohol in the glass than you originally thought.

I only really had the supplies together in one place until the final product.  So here's the materials picture!
Materials:  individual pics scattered throughout this blog post.  Play Where's Waldo's stuff
4"x4"x18" wood block
lamp wiring kit
Sticky Tack or Sugru
old lampshade (note: you will be taking apart)
84 slides ordered from ColorSlide.com
168 + 14,  4mm jump rings
14 6.5mm jump rings

Before you turn pieces that require any type of drilling through the center, you should drill the hole first.  Just so it's centered & you'll have 2 points to turn around.  Because this was such a long piece, I wanted to use the lathe as a drill which I tell ya, looks really cool.  Mostly because of this:
Action shot.  For reals
Because this was also, such a large piece, I didn't have a chuck that would be able to hold the wood.  I'd have to mount it in the chuck, and since we're already doing that, we're going for maximum surface holding in turning it round, then mounting.  Because I literally just said you should drill the hole first, drill an initial hole and then mount between centers.

When drilling using the lathe, you're turning the wood and driving the bit into that end; bit of a flip from what we're normally used to when using something like a drill press.
This is why we drill the hole first; it stays perfectly centered.
Next, turn completely round, and create a tenon.  Make sure that it'd fit in the chuck by measuring using calipers.  Honestly, this is the easiest way because eyeballing with a ruler just doesn't work because you'll end up measuring chords

Mount in a chuck.  Attach the drillbit to the other side of the lathe; we're now ready to drill!  While the wood spins, we're going to move the drillbit to it.  Turn the speed a bit lower than you'd use for roughing.  This is going to be an incredibly slow process so don't worry too much.
It took me pretty much 30 minutes-45 hour to get through the drilling and everything else
After you drill the hole, you can see all the way through!!!

Ok, turn baby turn.  I decided to experiment with flat surfaces and sharp lines while working on this piece.  Suggestion: go with the theme of your room.  You'll be happier with your lamp.  And that's kinda the whole point of doing this.

If you're interested in what I did, I focused on symmetry since the piece was a lot longer than it is wide.  & I'm ODC about that type of stuff.  I also tried to keep it a bit thick since it had to support the light at the top.

The pattern was a few stripes, deep sloping curve to a higher flat area, some beads centered between sharp valley, large flat area in the middle.

After the piece is turned, sand that sucker.  I used a clear wax to seal; before you use the wax, if you were planning on staining your lamp, that would be the time to do it.  I always sand and apply wax from the back of the piece while the lathe is spinning.  Use slowly graduating grits of sandpaper for best results.

Alright!  Finally!  Now, install your lamp kit according to the directions provided.  Hollow out a channel on the bottom of the lamp for the cord to run through so your base will sit flat.  Secure the cord in the cylinder by either using something like Sugru (permanent) or Sticky Tack (not really permanent)  And that's the lamp base.

You could be done now, and I'm sure some of you are closing your tabs by just using the lampshade.  It's all good.  Plus, I'm not going to lie, it's kinda expensive to get the custom slides.  Highly recommend pilfering scrap bins and parent's/gandparents'/older friends' attics.

Last chance to save that lampshade because it's coming apart like right now.  Sidebar: it's important to have a lampshade that will work with your chosen lamp kit.  Mine bolts at the top , but I cannot tell you how many I've seen that operate differently.  Remove the top part from the lamp.  Clean with some goo gone because that fabric tape is sticky.

The circumference of the circle of the lamp will give you a good idea of how many slides you'd need.  Mine was ~28" so I needed 14 slides to get all the way around.  To cover the ridiculously large topper for my lamp, I had to go 12" down, so 6 slides of height.  This is 84 individual memories.  Choose wisely as you'll be looking at them for a long time.
Or will they be looking at you?
Punch a hole in the center the backside of each edge of the slides using an awl and a hammer.  Hammer gently until there's a slight hole or almost punched through   I found this is the least intrusive way to put a hole in the plastic and does minimal damage to the slide.  Because we're punching holes so close to the edge, be careful of the plastic.
Poke hole through at the 1" mark

Use an awl to punch the hole.
After hammering on the back of the slide, flip and finish the hole through.  It doesn't have to be large, just enough for the jump ring to fit through.

Open the jump rings, and thread the slides through from the front to the back.  You don't want the seam on the outside of your lamp, and there's really no turning the ring in the hole when attaching.

 Thread the jump ring through the front of the slide so both fronts are facing each other.

Close ring.  Repeat for 14 slides across.

After completing 2 rows of 14 slides each, use a similar technique to attach the rows to each other.

Repeat for all 6 rows until you have a mat of slides.  Time to make it into a column!  This will be a  bit more challenging, and you might hear a few "pops" from the slides moving around a bit when manipulating them in column form.  Also if you could grow a second set of arms, that's pretty helpful too.

But it looks phenom after done.  Though it really can't stand alone; looks like it's had 1 too many shots.  Arguably some were to the side of the unit.

Let's get this sucker on the frame.  I used larger jump rings when attaching the slides to the lampshade frame.  You could also use a chain of the smaller links or use the large links for your entire lamp.  Adjust your hole placement accordingly.
Larger jump ring, small ring, small ring
Hold up your shade and do any last adjustments.  Sometimes a ring might come loose so make sure that you're not missing one.

Attach your lampshade to your lamp, and enjoy from all angles.  Especially enjoy sleeping in the right place.

</sidebar>

Friday, June 21, 2013

Refinished Bottle Cap Table

The best season for thrift hunting is the beginning of the summer.  People are on the move with dorm rooms to evacuate and apartments to swap; you can most certainly take down a stray butterfly chair, or bonus points! dresser set.  When I saw 2 side tables sitting in a generally known "I'm getting rid of these and if you want them you can take them otherwise they're getting picked up by the dump truck" space, I checked my license (read: currently unoccupied floor space) and bagged some beauts.

Big Image
Teddy would be proud.
<http://www.theodore-roosevelt.com/trafrica.html>


Giddy with the celebratory beer and the fact I just gained ~$30 of decor, I decided to challenge myself to use only the crafting supplies I had on hand to resurface one of the tables for use in the outdoors.  I'm just as guilty as everyone of buying new supplies just to follow up on an idea.  Though after awhile, your stockpile contains a bit of everything.

This isn't even everything.
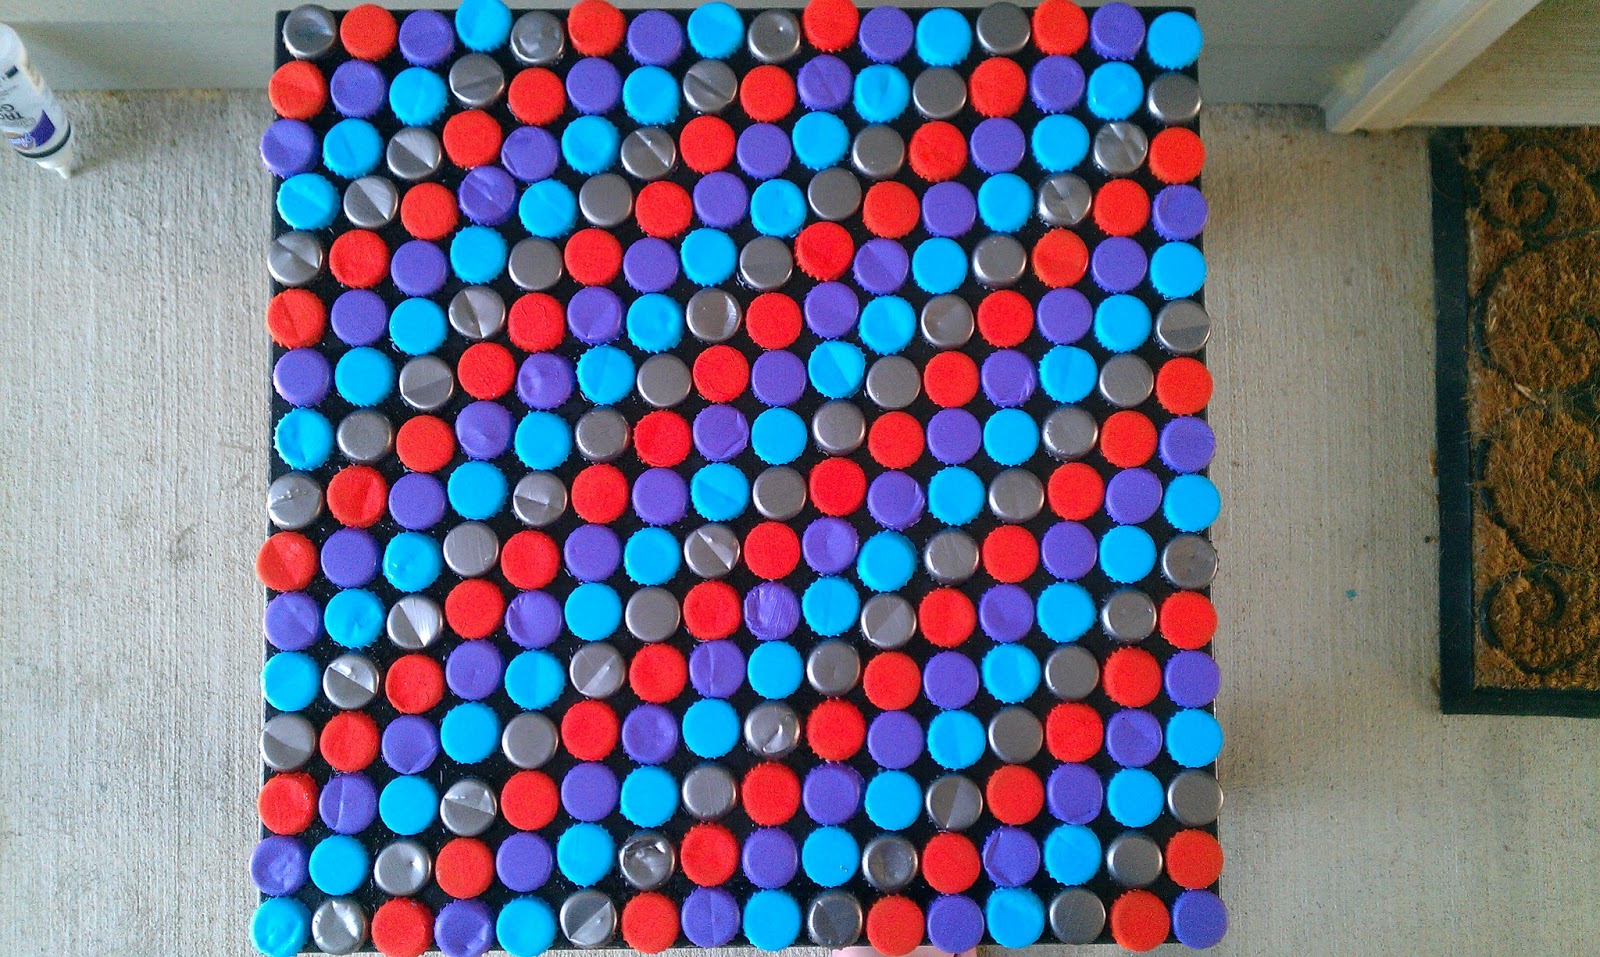
Challenge: remake the outside table using only the materials on hand.  Total individual project cost: free!  Because supplies are like beer: if you bought it before, using them now doesn't factor into the cost.  I rounded up some bottle caps in true sidebar style to create a fun diagonal pattern to cover the top of a planter table.  And did I mention it was free???


Materials
Side or End table
256 bottle caps; enough for 16x16 dimension bottle cap table - can be slightly bent
Acrylic paint - light blue, orange, plum, white
Glue
Modge Podge or other sealant

Determine how many bottle caps are going to fit around the top of your table.  I layed out a 16x16 pattern on the top of mine.  Remember if you're using salvage bottle caps, they're more than an inch a piece, more like 1 1/8" - 1 1/4" each.  It's a good jumping point, but sometimes the best thing to do is lay out the caps.
If you lay out all of the caps, it could crowd.
Pro tip: start collecting bottle caps.  I've been obsessively collecting them to refinish the top of the mini bar and they've just become a valuable resource to have up your crafting sleeve.  Mostly because there are so many things you can do with caps.  These are 256 things you can do, right here on the floor.

It took me days to pick out which ones would be sacrificed.  This was painful
After you identify the sacrificial victims, break out the pants.  I went with bright colors to contrast the black and a metallic because we're going fancy.  It's a pop of color in a pop of color.  I chose orange, light blue, purple, and pewter.  I wouldn't go more than 4 as the color scheme just gets crazy at that point.  We're fancy, not gaudy.  Paint 64 bottle caps each color.

Make sure they go well with black.  That answer should be obvious; everything goes with black
Sidebar #2: the next step will be so much easier if you have spray paint.  I'm only using the acrylics from a tube and hand painting each because the challenge had been accepted.   For the love of Biscoff spread, use spray paints.  It took a documentary, comedy, and drama to get through them while I should have just watched Disney's Hunchback of Nortre Dame because that's what I looked like after I was done painting.  However... free.

You fancy huh?
After they dry, arrange the caps on the table in a diagonal line.  Alternate the colors: purple, orange, pewter, light blue.

After getting the rows all laid out, it's time to start gluing.  Take off the first 3 rows from the end, and apply the glue liberally to the table.


Smear around the glue with a bottle cap.  Place in a row.

Continue up the row; gluing down 2 rows at a time.  The glue will hang over into the 3rd row.  Take off next 2 rows.

Repeat across the surface of the table.  After you're done, seal with a coat of Mod Podge or other sealant.

Be prepared for some complements, and at least one place to put things when trying to carry up all the bags from your car ever!  Get that porch garden ready to go by picking up the plants approved by Southern Living.  Then you know you're truly ready for your feature article.

</sidebar>

Friday, June 14, 2013

Gift Kit: 1-2-3-Teach!

I'd think the 3 biggest bar nights of the year in the States are: St. Patrick's Day, Cinco de Mayo, and the day before spring commencement.  Unless you're in Michigan where you'd have to account for the day before Thanksgiving.  You could argue that they're giving thanks for the bartenders that care for them throughout the year, and that help them "remember" the recipe for the best Bloody Mary that they'll be making the next morning while splashing a bit into the stuffing.

I'm sure in the morning you actually look like Bloody Mary as well
<http://partypipes.com/bloody-mary/>
Amongst these graduates opening their hung-over-from-college eyes, are several that will join the next wave of the people that helped get them there.  Yes, these wonderful, tolerant, generous, sweet, and currently enjoying the first summer break from the other side of the desk people are collecting their red pens and gearing up for the start of the new school year.  I have a great deal of respect for teachers; anyone who is willing to deal with a) small children, b) bratty tweens, and c) entitled and lazy teenagers is under appreciated within our society.  The last thing most young people do is want to learn, and a lot of what school teaches you is only understood later.  The ones that teach for the passion of learning and for the children are some of the most valuable shapers of society. </soapbox>
This is about how old I sound right now.  Next they'll be getting on my yard.  I'm so crotchety I didn't pay for the picture :P
<http://www.shutterstock.com/pic-1509878/stock-photo-yelling-old-man.html>
For more about the state of education today, you can peruse Netflix's category with several documentaries on the subject that bring up problems from money to incentives to kids' behaviors.  Ok, really they're not all that bad, but there's always the one.... even in the "real world" there's alllllways the one.  Straight talk: teachers bring in a lot of their own stuff to help create the classroom environment to encourage learning and discovery of the world's secrets.  I'm sure that everyone has a teacher they remember from school.  A tall drink says they brought in their own stuff.

90% funded out of the generosity of their hearts and 100% reused for years
<http://mrsleeskinderkids.blogspot.com/2011/08/my-sisters-second-grade-classroom-pics.html>

So, we're putting together a graduation gift kit for those awesome new teachers that will get some essentials for all levels and the flexibility to customize per grade level.  These are a few of the basics that will free up your new teach to get specifics based on curriculum.  Congrats new grads and welcome new teachers!

Elements of this gift kit:
+ Pens - black/blue/red  --  highly recommend going the crafty route with the clay covered pen tutorial from Creative in Chicago.  I made a few and use them all the time at work!
+ Sharpies - multiple colors for multiple reasons!  "All teachers need sharpies" - an old pro
+ Sticky notes - you can never have enough sticky notes.  Ever.  I got 2 because one had funny sayings on it and everyone needs a partial to do list on a sticky note.  You can usually find fun ones at Fred & Friends.
+ Journal - notes for the day and other teacherly commentary
+ Page Flags - mark places in the text book or other
+ Paper clips - get to gradin!
+ Desk Bin - for holding kit
+ Target Gift Card - the universal Teachers' Mart
&&& the most important & appreciated element: emergency chocolate

I got pretty much everything here from Target.  Because you get me going in the dollar bin section and there's no stopping me.  What's nice is that meant that I was able to assemble a lot of things that were essentials & not feel like breaking the bank with the gift card.


Other things that teachers <3
Pencils - if you're bored of mechanical ones, and you've got a green thumb check out Sprout
Dry erase markers
Apples/apple related things  (yessss easy birthday gifts) :)
Magnetic clips for their chalkboards
Chalk
Badge holders
Watch - clip or wrist
Fun and indestructible bins of all sizes

If your teacher is mobile; I suggest getting a rolling cart or file cabinet cart to hold everything.  If you're really ambitious and the teacher knows he/she'd like a desk, check out some tutorials on nomadic furniture.  You yourself might learn a few tricks.  Education: the gift that keeps on giving.

</sidebar>

Friday, May 17, 2013

Pop Tab Chain Necklace/Bracelet

There comes a breaking point for everyone where they just put their foot down and say "no".  Mine came when I scraped 3 quarters from various change stashes but was still 5 cents short for the soda machine at work.  I refuse to pay 80 cents for a soda.  What is this?  A school for ants?!?!  Even they'd get better deals.
Vending machines will have calorie counts starting in 2013 (Creative Commons)
The face of tyranny.
<http://www.neontommy.com/news/2012/10/soda-companies-announce-calorie-counting-vending-machines>

So I started to bring in my own Diet Coke.  Sidebar: no one judges me as hard as I do myself when 2 of the 10 items in my cart at Price Club are Diet Coke related.  And no one judges you when you get in extra early to bring the pallet to your desk.  I started saving the tabs for my coworker's kid's schools' charity when the school year ended.  Much like my coworker from the last sentance I was in possession of a capful of soda tabs allowing everyone who passes my desk to pass judgement.
I'm just glad the counts on these aren't inverted.
For you metalworkers out there: these MIGHT be the one part of the soda can that you can use for casting.  For you chainmaile workers out there: pop tabs are effectively 2-holed jump rings.  They can be used to create simple chains that function miniorly effectively.  Each hole can fit up to 4 tabs across which was perfect for creating a chain for my wallet in high school.  Oh snap, that's rebellion right there.  Pop tabs can also help dress up outfits as a chain necklace or wrap bracelet.  From day to night; soda can keep you running.

Materials
80 pop tabs == 80 Diet Cokes/tabbed beverages
Nail Polish (optional color pop)

Lay out your tabs in a rough circle pattern to get an idea of how long your necklace or bracelet will be.  I went with a length of 40 tabs with 2 tabs per joint in the chain.  This is enough for 3 wraps around my wrist and a fairly long necklace.
Roughly what it'd look like
Before we get to cutting, we're going to add color.  Apply 2 coats of nail polish to all colored pop tabs.  I painted 16 purple.
x16
Unlike jump rings that are actually designed for chains, you have to do a bit of modification to the tab otherwise you end up with just a pretty pile.  The top loop is the side that was not attached to the can and the bottom is the side that was.  Cut the top loop of the tab open at the very top.  This way when it's chained, you can cover the cut at the top with the other member of the chain.  Cut all your tabs.
Cut is at the top
After you cut the tabs, pair 2 tabs with the top sides facing out.  Let's look nice from all sides of the chain.  This is jewlery after all.  Keep it classy Raleigh.

Time to start chaining.  Thread the top of one pair through the bottom hole of the next pair.  It might scrape against the outside of the tab.  I found it easier to open the top of the tab so the bottoms could slide right in.  Close the ends of the tab.
-1
Repeat for both tabs.

Repeat above for all tabs.  I inserted a purple pair every 5th tab.
Carefully attempting to avoid scratching the nail polish.

Work until you've created a single chain of all your tabs.  Carefully ensure there are no twists in your chain when joining the ends.

Make a statement.  More than "I drank a lot of soda"

</sidebar>