After a long Friday night-Saturday of experiencing the weekend to the fullest, sometimes a Bloody Mary isn't enough to shake that feeling of restlessness. The "have I done enough with my weekend" feeling that never really goes away if you think about it for too long. And the conquering of the next day goes best with grabbing a cup of coffee, tea, or hot cocoa. With a towel and a coaster to prevent catastrophes of course.
Components
Cappuccino Mug
Hot Chocolate on a Stick
Printed Tea Towel
Coasters
Coffee-Scented Candle
Fun Straws
Tea Bags
Biscoff Biscuits
Emergency Chocolate
Personalized Cappuccino Mug
When I was in Italy, I got used to drinking 2 cappuccinos a morning. The first day, my right leg about shook itself off my body. By the last day, the second cup was what I needed to get through the rest of the caffeine free day. Now, in my defense, these were European portions, not the huge cups I found for this kit. Two cups this size and I would have been able to climb up and down those hundreds of steps along the Amalfi Coast... twice.
Materials - from
Kate's Creative Space's Primal Instincts
Ceramic Cappuccino Mug
Chalkboard paint - black or contrasting color
Enamel paint - used sage green
Trace or freehand draw a tea bag on the onto the mug using a pencil. Or freehand for expert level crafting! Fill in with chalkboard paint. Let dry; and paint in the opposite direction. Let dry for 24 hours.
Paint on the string from the end of the tag into the cup. Remember! Don't wash in the dishwasher and be careful around the paint!
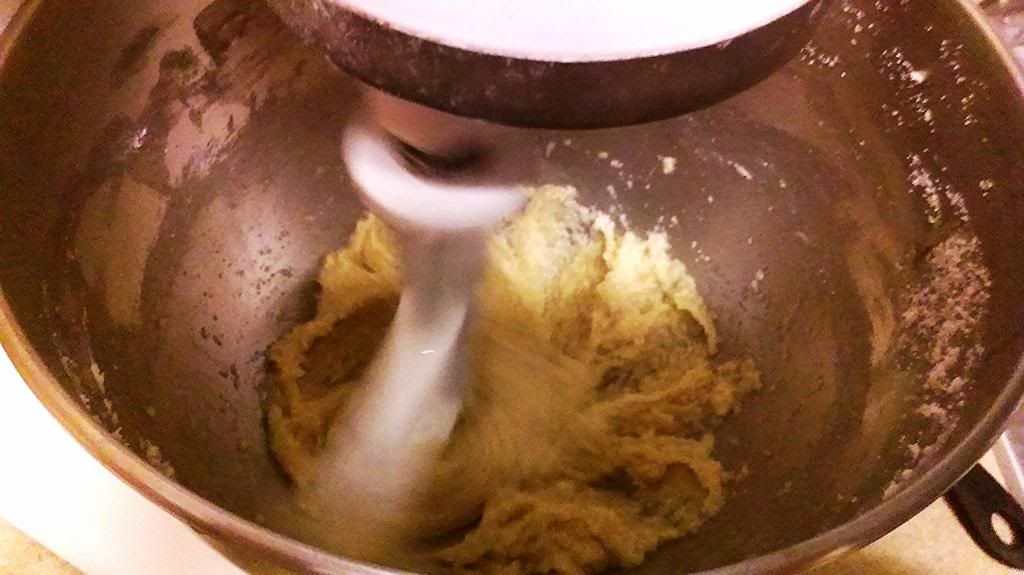
Hot Chocolate on a Stick
The puppeteer Jeff Dunham taught me you can put anything on a stick or "steek" and make it awesome, while the cake pop revolution taught me that virtually any food item on a stick makes it more tasty. This is something sushi can claim partial hipster points for since it is eating using sticks.
Ingredients - adapted from
30 Pounds of Apples's Hot Chocolate Sticks and
King Arthur Flour's Cocoa Blocks
1/4 cup heavy cream
7oz (1/2+1/8 cup) sweetened condensed milk
1 1/2 cups semisweet or bittersweet chocolate - melted
6 tbsp cocoa powder
2 tbsp oil
1 tsp coffee - optional if the recipient likes coffee
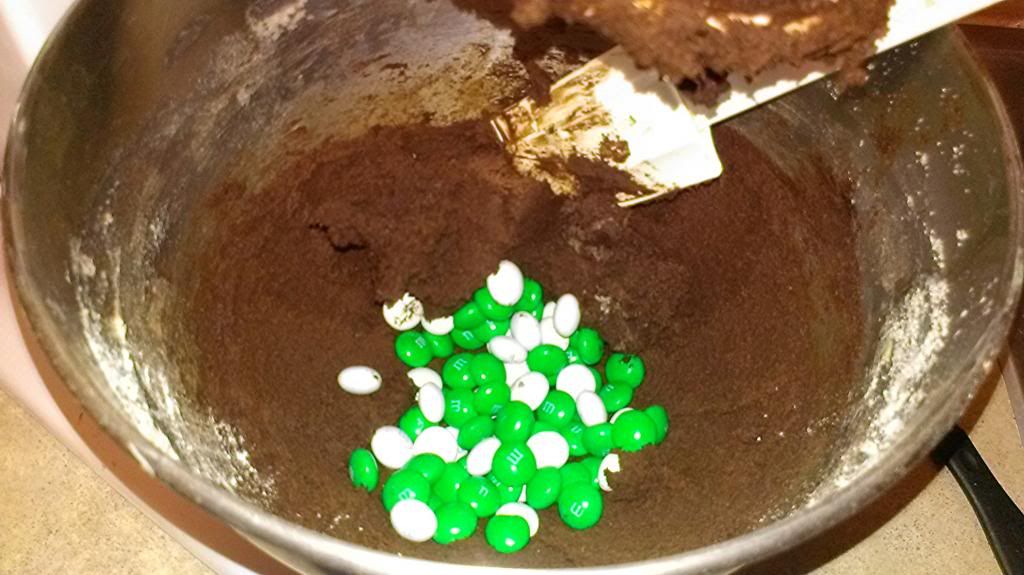
72 mini marshmallows
wooden stir sticks/cake pop sticks
Mix all ingredients minus the marshmallows together. Pour mixture into silicone (simply for easier removal) ice cube tray. Place 4 marshmallows in the corners of each cube & a stick in the center.
Let sit in the freezer overnight. Pop out and wrap in clusters. Small tags with how to make hot chocolate on a stick are optional because it's much more entertaining to figure out how to make it yourself. Personally I go for the "dissolving in saliva" method; it's emergency chocolate on the go. Sticks really do make everything better!
Printed Tea Towel
Materials - from
Brit + Co's DIY Neon Patterned Tea Towels
Spray Dye
Napkins or tea towels
painters tape
Iron and lay out tea towels.
Tape out pattern on the tea towels. I did a diamond and a tartan pattern. Use up that painters tape.
Spray the paint onto the towels. I used 2 colors per towel: green and blue on the tartan tape, yellow and green on the diamond towel.
Let dry for 4 hours. Remove tape.
Coasters
I've already covered how to make
bottle cap coasters and how to use
alcohol ink for decoration (scroll to the section on "Coasters" - incredibly original). If neither of those is what you're looking for in your gift kit, you can try the 3rd option in the flight: using washi or decorative tape on a tile coaster. I see your challenge and I'm accepting it - you
will find a coaster you like.
Materials
Washi tape
Tile in white or complementary colors to your tape
Sealant
sugru, small rubber feet, or no-skid pads (4 per coaster)
It couldn't be more simple: lay the tape however your heart desires across the tile. Let a little overlap the edges. Cut; I found using an exact knife worked well. Seal. Let dry. Enjoy not marking your furniture.
 |
| Examples of patterns |
I recommend designs that don't end with the tape in the middle of the coaster because it looks like you honestly forgot to finish extending the tape. Plus your cuts have to be perfect, and that's quite annoying after awhile.
Coffee-Scented Candle
From the
amount of times I use old
votives in crafts, you probably getting the correct impression that I'm addicted to candles. Extra drinks for you. I had some ones in the new Glade 3oz design which unfortunately can't run through the dishwasher and masquerade as something new. Curses, looks like I'll have to burn the midnight candle on repurposing those.
Materials - from
Henry Happened's French Vanilla Scented Candle
3 oz votive
Soy wax
Wick with holder and glue
Whole coffee beans
Vanilla beans chopped or vanilla scent
To fill these most votivey of votives, I decided that
I wanted to perfectly replicate the smell of an easy Sunday morning all day long. So much easier than trying to fire up the coffee maker, and grind the beans, and wait for the coffee... Makes me want to just eat a hot chocolate on a stick. Or enjoy coffee porter.
Extras
In case you haven't figured it out yet, I'm confident the only shot that needs to be served in any situation is chocolate. Preferably dark. Just like my coffee. And beer. Rounding out a morning you can look forward to as much as the fun experience of the night before are tea bags of assorted teas and some Biscoff cookies. The world's problems can be solved with a simple supplement of these embodiment of goodness each morning.
Putting it All Together
Place items in cup & place in bag with newspaper as support. Because they've been running around so much before, the recipient probably haven't had a chance to catch up on local news in their or your neighborhood. Due to how this also is constructed, you can place the kit in box to wrap as well. In the world of gift bags, it's nice to have something substantial to unwrap. After assembly, enjoy 1 drink of choice as this gift is as easy as whatever day on which you've finished assembly.
</sidebar>