Showing posts with label outdoors. Show all posts

Tuesday, May 13, 2014

Wooden Crate with Lid

Summer is awesome for a wide variety of reasons.  Most of them being picking/snacking on fresh fruits and veggies, drinking a fresh brew on the patio in the evening, and getting back into my shop because it's no longer a health risk to expose bare flesh.  I'm saying summer because we kinda skipped over that whole spring thing and went right from pollen season to heat season.
Weather.com
Summer is also great for all the different outdoor games that have been unlocked with the arrival of outdoor-tolerable temperatures.  I Kickstarted (that has now officially been made a verb) a game last summer which was really interesting, but unfortunately was contained only by the US Postal Service's large standard shipping box.
Picture of Finishing Touches!
Not anymore!
So my first instinct was to build a proper storage crate for the pieces.  I also wanted a lid, so nothing would get on the game pieces when transporting them places.  And bonus!  I could balance things on the lid like snackage when bringing it to people's houses.
Picture of Wooden Crate with Lid
Fits a 8x8 or 9x13 dish on the top!
It's 12x12x7 so it can hold a lot of stuff.  Actually, whatever you can fit into a USPS Flat Rate Large Box as the interior dimensions are just an inch taller. Head on over to Instructables to see the complete build at Wooden Crate with Lid.

</sidebar>

Saturday, December 14, 2013

Adventure Go Bag

There's a recent TV add that brought up an excellent point a body at rest tends to stay at rest while a body in motion tends to stay in motion.  The only reason I'm able to remember or even see that commercial is I was trapped on the elliptical where it ran about every commercial break for the show I was "watching". The time I spent focusing and/or reflecting on that commercial was time I wasn't focusing and/or reflecting about how much I had to be on said elliptical.
Winter is Coming.... now back to our feature presentation.
<http://f2cbootcamps.com/3-common-workout-sins-for-fat-loss/>
I don't have arthritis, so while I can't support their main message, bear with me: my way-in-depth-analyzation-skillz show it does make sense. Who hasn't tried to come up with a grand idea of traveling somewhere, thinking of all the things to do when there, & then left it at that?  Body at rest.  Just as a passing thought as we go back to the trip we make every day: the chocolate stash.  Or the cream cheese stash.
Some of them are for emergencies... like, pumpkin?  That qualifies.
Sometimes all we need is a good push and the right equipment.  The habit of adventuring is much like sampling cookie dough: once you start, you can't stop.  Much like the level of sneak needed to get the cookie dough from under the nose of others who may be in the kitchen, you need the right equipment to get started without also figuring out how many different ways you can lay out a Target. "Go bags" are a collection of everything you need collected and easily at hand if you have to get moving right away in an emergency situation.  Power grid outages and the zombie apocalypse wait for no one.  I created this adventure version with a day trip of hiking in the mountains in mind & a magazine to spark future trips.  It's a good starting point and you can tweak as needed for your choice of destination.


Components
*Square Pack from Drifter Bags
Dark chocolate orange from Private Selection
*Topo Water Bottle - Yosemite from Liberty Bottle Works
2 emergency kits from Coleman
*Paracord
*Planters Nuts mix (granola + crasins + almonds + pistachios)
Aleve 50 75 count - I've seen this medicine work in ways I've never thought possible.  Miracle in a bottle, hands down
*Migraine Strength Excederin 50 count - hands down the best for headaches ever.  I carry a bottle everywhere with me.
*Included pouch from Drifter (oh yeah bonus camera case/emergency money pouch!)
*Go Escape travel magazine
*Bantam BHW pocket knife by Buck Knives
LED pocket flashlight from Coleman  (would have really liked to get a CREE made in the USA one, but those are neigh impossible to find in sizes below "tactical")
*Emerald cinnamon-roasted nuts

* - Made in the USA

That above asterisk is pretty important to me.  I happen to live in that awesome country where a lot of goods are still manufactured.  I even try to go one step further and buy local whenever I can; it's good to support your community since, well, that's where you chose to live.  And I figure everyone wants their community to be vibrant and booming.  Also, those products bring quirks to your area and make it a wonderful place to adventure itself!  I will so take my beer from all the local breweries in a to-go cup please!

All packed away.  I left the waterbottle in the box because I wanted the recipient to be extra surprised!
(it's the favorite national park!)
May the road rise to meet you.  Carpe diem!

</sidebar>

Friday, June 21, 2013

Refinished Bottle Cap Table

The best season for thrift hunting is the beginning of the summer.  People are on the move with dorm rooms to evacuate and apartments to swap; you can most certainly take down a stray butterfly chair, or bonus points! dresser set.  When I saw 2 side tables sitting in a generally known "I'm getting rid of these and if you want them you can take them otherwise they're getting picked up by the dump truck" space, I checked my license (read: currently unoccupied floor space) and bagged some beauts.

Big Image
Teddy would be proud.
<http://www.theodore-roosevelt.com/trafrica.html>


Giddy with the celebratory beer and the fact I just gained ~$30 of decor, I decided to challenge myself to use only the crafting supplies I had on hand to resurface one of the tables for use in the outdoors.  I'm just as guilty as everyone of buying new supplies just to follow up on an idea.  Though after awhile, your stockpile contains a bit of everything.

This isn't even everything.
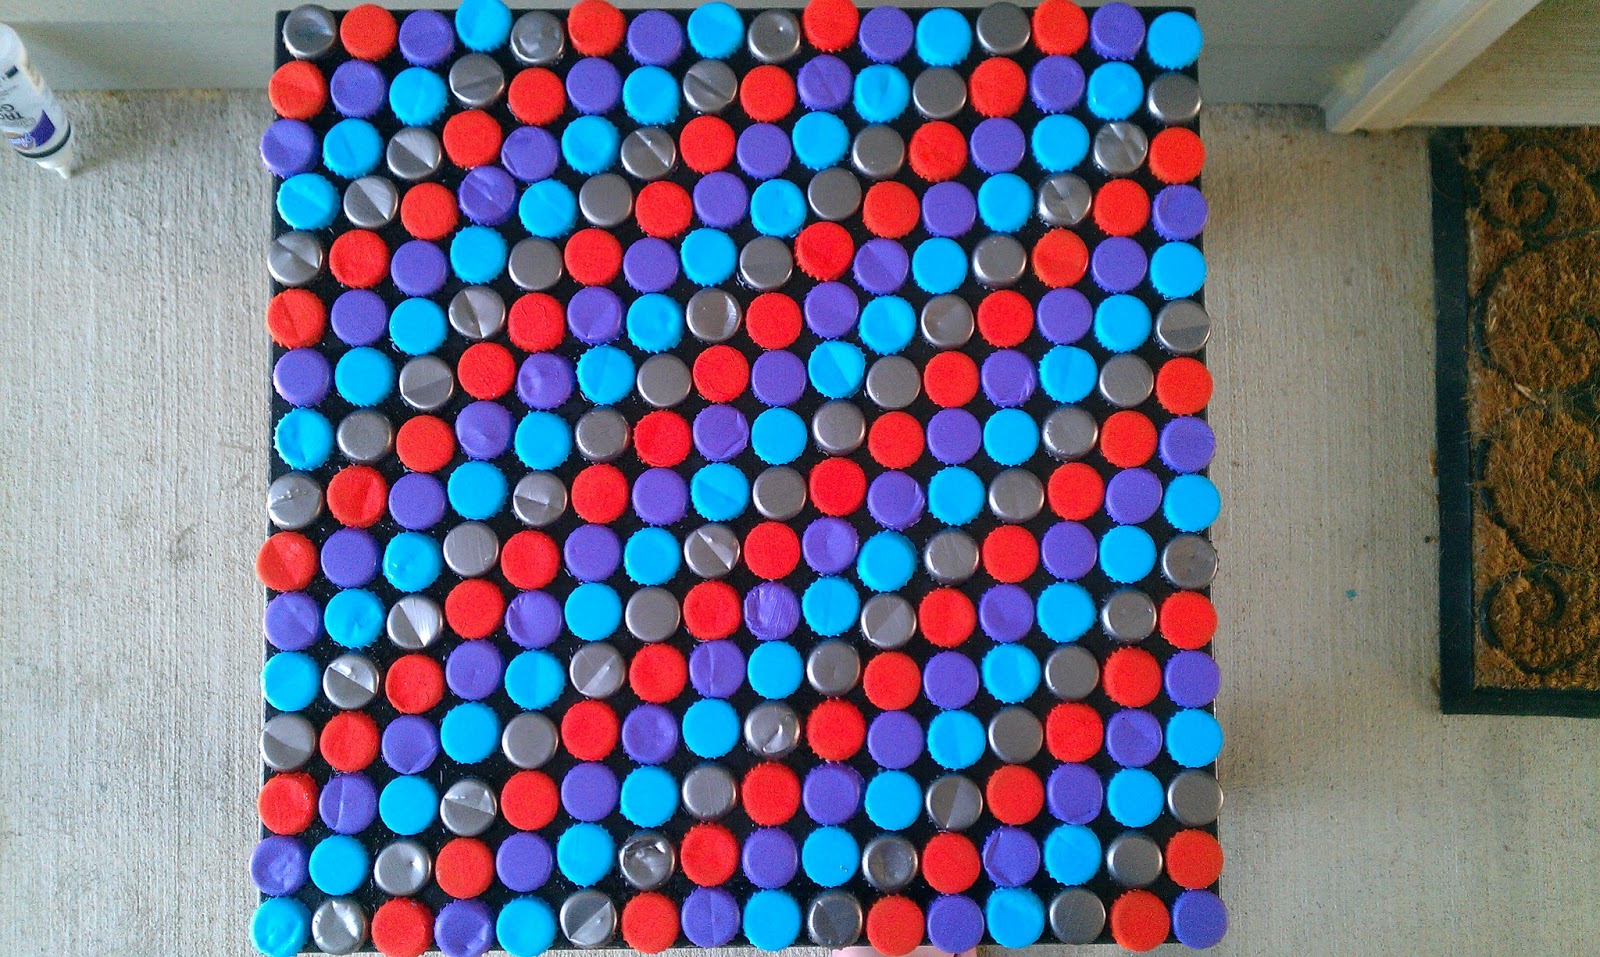
Challenge: remake the outside table using only the materials on hand.  Total individual project cost: free!  Because supplies are like beer: if you bought it before, using them now doesn't factor into the cost.  I rounded up some bottle caps in true sidebar style to create a fun diagonal pattern to cover the top of a planter table.  And did I mention it was free???


Materials
Side or End table
256 bottle caps; enough for 16x16 dimension bottle cap table - can be slightly bent
Acrylic paint - light blue, orange, plum, white
Glue
Modge Podge or other sealant

Determine how many bottle caps are going to fit around the top of your table.  I layed out a 16x16 pattern on the top of mine.  Remember if you're using salvage bottle caps, they're more than an inch a piece, more like 1 1/8" - 1 1/4" each.  It's a good jumping point, but sometimes the best thing to do is lay out the caps.
If you lay out all of the caps, it could crowd.
Pro tip: start collecting bottle caps.  I've been obsessively collecting them to refinish the top of the mini bar and they've just become a valuable resource to have up your crafting sleeve.  Mostly because there are so many things you can do with caps.  These are 256 things you can do, right here on the floor.

It took me days to pick out which ones would be sacrificed.  This was painful
After you identify the sacrificial victims, break out the pants.  I went with bright colors to contrast the black and a metallic because we're going fancy.  It's a pop of color in a pop of color.  I chose orange, light blue, purple, and pewter.  I wouldn't go more than 4 as the color scheme just gets crazy at that point.  We're fancy, not gaudy.  Paint 64 bottle caps each color.

Make sure they go well with black.  That answer should be obvious; everything goes with black
Sidebar #2: the next step will be so much easier if you have spray paint.  I'm only using the acrylics from a tube and hand painting each because the challenge had been accepted.   For the love of Biscoff spread, use spray paints.  It took a documentary, comedy, and drama to get through them while I should have just watched Disney's Hunchback of Nortre Dame because that's what I looked like after I was done painting.  However... free.

You fancy huh?
After they dry, arrange the caps on the table in a diagonal line.  Alternate the colors: purple, orange, pewter, light blue.

After getting the rows all laid out, it's time to start gluing.  Take off the first 3 rows from the end, and apply the glue liberally to the table.


Smear around the glue with a bottle cap.  Place in a row.

Continue up the row; gluing down 2 rows at a time.  The glue will hang over into the 3rd row.  Take off next 2 rows.

Repeat across the surface of the table.  After you're done, seal with a coat of Mod Podge or other sealant.

Be prepared for some complements, and at least one place to put things when trying to carry up all the bags from your car ever!  Get that porch garden ready to go by picking up the plants approved by Southern Living.  Then you know you're truly ready for your feature article.

</sidebar>